Today, we are taking a look at a really useful but often underused feature in Google Analytics.
Custom Alerts – an alerting system in Google Analytics that makes sure you get notified whenever something unusual happens with your website’s metrics.
Why use Google Analytics Custom Alerts?
Have you ever noticed a sudden drop or spike in your website traffic or some of its key metrics? Wouldn’t it be great if next time something like this happens you’d get an email informing you about what’s happened?
This is exactly where Custom Alerts can help you. You tell Google Analytics what segments and metrics it should track and the system will automatically let you know if your set threshold has been exceeded. You can configure both absolute and relative thersholds and make them equal to any value that makes the most sense in your case.
Having a custom-built business dashboard is a must and it’s great if you already check them quite often but nothing is more effective than an automated alert. You might be busy with other stuff or out of the office for a few days and not check the dashboards but your alerts will do the work for you.
Our recommendation is to keep it simple, have alerts for the most important metrics and segments. You should still have and check your dashboards for detecting long term changes and nothing can really replace the good old analyzing of the reports and working with the raw data. But, having a Custom Alert to back you up is really important, too.
How to create a new Custom Alert in Google Analytics?
Before you start setting up your Custom Alerts, here’s what you should keep in mind.
- Custom Alerts are set and work on a view level
- You can have your alerts delivered via email (and SMS in the US)
1. Planning your alerts
The first step should be planning your Custom Alerts. Think of your most important metrics, traffic sources and segments. Try to map the things you usually check first in your dashboards and reports. Write down 2 – 10 combinations that seem most important and create alerts for them.
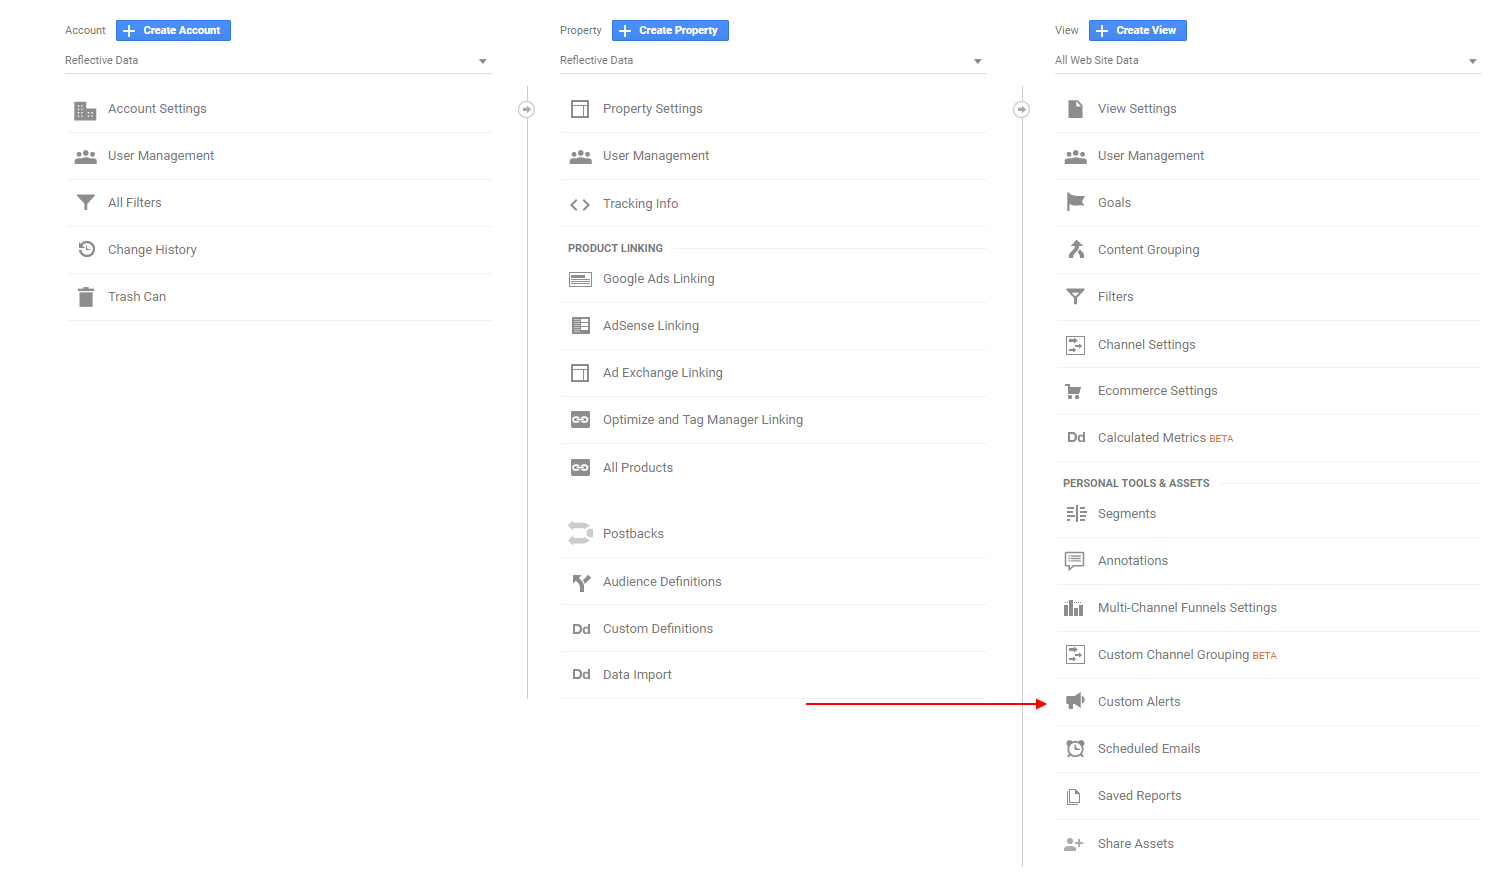
2. Head to Custom Alerts section
In Google Analytics, go to the admin panel and look at the first column from the right (View). In the Personal Tools & Assets section, you’ll find Custom Alerts.
3. Configuring the Custom Alert
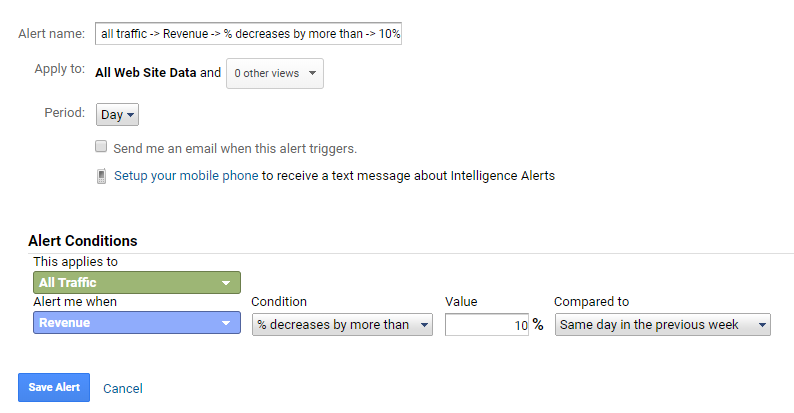
Alert Name – choose something that describes your alert in detail. A good example is
“all traffic -> Revenue -> % decreases by more than -> 10% -> previous week”
Apply to – choose your main reporting view
Period – Choose either Day (compared to previous day / the same day in the previous week / the same day in the precious year), Week (compared to the previous week) or Month (compared to previous month / the same month in the previous year).
When choosing the period, think about your traffic and how fast things usually change. If you have just a few conversions each day, maybe a 50% difference between days is usual/random.
Delivery method – make sure your alerts get delivered via email. you can add more than one email address. In the US, alerts can be delivered via SMS, too.
Alert Conditions – this is the most important part which defines how your Custom Alerts work.
First, choose the segment of visitors that the alert should track. A few common ones are desktop/mobile, organic, direct etc.
Next, choose the metric in focus. You can choose from whatever you like but some common ones are sessions, bounce rate, goal conversion rate, e-commerce conversion rate etc.
Finally, choose the condition. This determines how big and in which direction the change has to be in order to trigger the alert. This really depends on your traffic. For some, a 10% change is big while others see 50% changes daily.
Awesome! Now hit “Save Alert” and you’re all set. Time for your next Custom Alert.
Which Custom Alerts to choose?
Now that you know how to set up a new Custom Alert in Google Analyitcs, let us give you a few ideas about which alerts you should have.
Site usage
Sessions
all traffic -> Sessions -> % decreases by more than -> 10% -> same day in the previous week
all traffic -> Sessions -> % increases by more than -> 10% -> same day in the previous week
Bounce rate
all traffic -> Bounce Rate -> % decreases by more than -> 10% -> same day in the previous week
all traffic -> Bounce Rate -> % increases by more than -> 10% -> same day in the previous week
Goals
Goal X Conversion rate
all traffic -> Goal 1 – Conversion Rate -> % decreases by more than -> 20% -> previous week
all traffic -> Goal 1 – Conversion Rate -> % increases by more than -> 20% -> previous week
E-commerce
Revenue
all traffic -> Revenue -> % decreases by more than -> 10% -> previous week
all traffic -> Revenue -> % increases by more than -> 10% -> previous week
Transactions
all traffic -> Transactions -> % decreases by more than -> 10% -> previous week
all traffic -> Transactions -> % increases by more than -> 10% -> previous week
E-commerce Conversion Rate
all traffic -> E-commerce Conversion Rate -> % decreases by more than -> 10% -> previous week
all traffic -> E-commerce Conversion Rate -> % increases by more than -> 10% -> previous week
Acquisition
Organic Traffic
Medium -> matches exactly -> organic -> Sessions -> % increases by more than -> 10% -> same day in the previous week
Medium -> matches exactly -> organic -> Sessions -> % decreases by more than -> 10% -> same day in the previous week
Direct Traffic
Source -> matches exactly -> (direct) -> Sessions -> % increases by more than -> 10% -> same day in the previous week
Source -> matches exactly -> (direct) -> Sessions -> % decreases by more than -> 10% -> same day in the previous week
Referral Traffic
Medium -> matches exactly -> referral -> Sessions -> % increases by more than -> 10% -> same day in the previous week
Medium -> matches exactly -> referral -> Sessions -> % decreases by more than -> 10% -> same day in the previous week
Congratsulations! You should now have a decent overview of how Custom Alerts work in Google Analytics and at least a few ideas for setting up alerts for your own website.
Should you have any recommendations or questions about Custom Alerts, shoot them in the comments below.
OK